Planting seeds is about more than just putting them in the ground. Every step shapes your harvest. If you want strong, healthy crops, you need all the parts of your planter working together. One key piece? Closing wheels. In this guide, you’ll get a clear look at what closing wheels are, why they matter, and how to pick and use the best closing wheels for planters. Whether you’re planting corn, soybeans, or something else, the right wheels can help you get the results you want.
What Are Closing Wheels and Why Do They Matter?
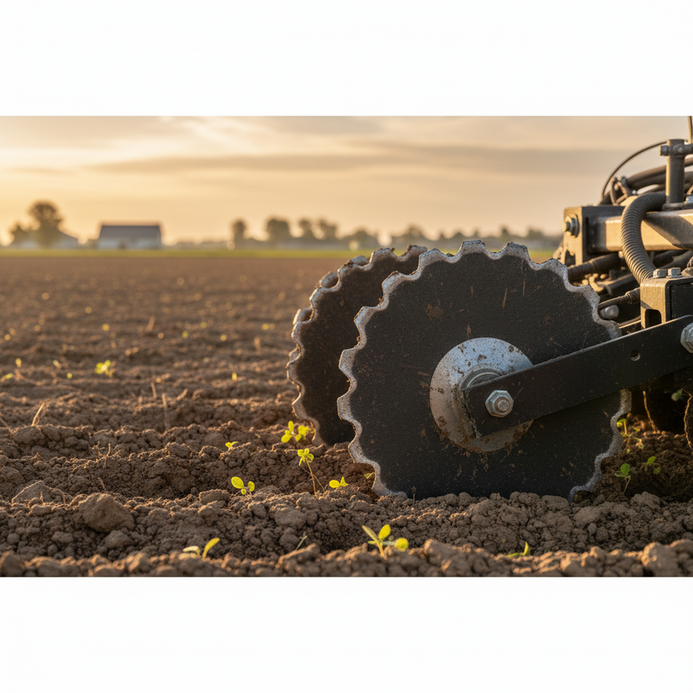
Closing wheels are the round parts at the very back of your planter. After the seed drops into the trench, the closing wheels squeeze and press the soil back in place. It might sound like a small job, but it’s a big deal for your seeds.
Think about what a seed needs right after planting. It wants tight contact with the surrounding soil (that’s called seed-to-soil contact), enough moisture to sprout, and no big air pockets that keep roots from growing down. If the soil isn’t packed right, you could see uneven emergence, some seeds sprout fast, others late, and some not at all. This can lead to gaps in your rows and weaker yields.
When closing wheels do their job, they gently but firmly push just the right amount of soil onto the seed. This closes the trench and gives each seed the best start. If the wheels don’t close the trench well, or if they pack the soil too tightly, you might end up with crusted-over ground, roots that struggle, or seeds that dry out before they sprout. Ever noticed some plants shooting up while others lag behind? Poor seed-to-soil contact is often the cause.
Types of Closing Wheels: Which One Is Right for Your Planter?
Not all fields are the same, and closing wheels aren’t one-size-fits-all. Choosing the right type can make a noticeable difference in how your crops grow. Here are the most common types you’ll find on today’s planters:
- Smooth Rubber Wheels
- Spiked or Finger Wheels
- Cast Iron Wheels
- Curved Tine Wheels
Smooth Rubber Wheels
These are the classic closing wheels, and you’ll see them on lots of planters from the factory. They’re made from tough rubber and have a flat, smooth surface. Smooth rubber wheels are gentle on the soil, so they work best in fields that are well-tilled and have good moisture. Since they don’t dig in much, they help avoid packing the soil too tightly, which is key for young roots to push through.
Say you’re planting after a traditional tillage pass and the soil is loose and moist. Smooth rubber wheels close the trench gently without causing hard spots. However, if you’re dealing with heavy residue, wet spots, or tough ground, they might not close the trench completely, leaving seeds exposed or air pockets below the surface.
Spiked or Finger Wheels
Spiked wheels look like they have metal fingers or spikes sticking out around the rim. These spikes are designed to break up soil clumps and punch through tough residue. They’re made for challenging conditions: heavy, wet, or high-residue fields where smooth wheels might just ride on top without closing the trench well.
Here’s an example: If you’re planting into last year’s corn stalks or a cover crop, spiked wheels can help chop through the debris and pull crumbled soil into the trench. They mix the soil without packing it hard. Spiked wheels can also help in clay soils that tend to crust over, as the fingers break up the surface and leave a loose finish.
Cast Iron Wheels
Cast iron wheels are heavier and more aggressive than rubber wheels. Their extra weight helps press down firmly, making them a solid choice for dry or hard soils where you need more force to close the trench. If you farm in areas with dry springs or compacted soils, cast iron wheels can make sure the seed is snug with the soil.
But be careful, if the field is wet, cast iron wheels might pack the trench too much, creating a hard crust that makes it harder for seedlings to emerge. It’s all about matching the wheel to your field’s condition.
Curved Tine Wheels
Curved tine wheels look almost like hands with curved fingers. Instead of packing the soil down, they gently crumble and toss soil over the seed trench. This makes them a favorite for no-till or minimum-till farming, where you want to avoid creating a hard layer above the seed.
Picture planting into untouched ground with lots of leftover plant material. Curved tine wheels help keep the soil loose and prevent crusting, so water can get in and roots can break through easily. They’re especially helpful if you rotate between different crops and soil conditions during the season.
How to Choose the Best Closing Wheels for Your Planter
Ever wondered why your neighbor’s field might look greener or more even than yours? Sometimes, it comes down to small choices, like which closing wheels you use. Here’s what to consider:
- Soil Type: Sandy soils usually need a gentler touch, while clay or heavy soils might need more aggressive wheels to close the trench and break up clods.
- Moisture Level: Wet fields are easy to compact, so lighter or spiked wheels often work better. Dry fields might benefit from heavier wheels that ensure the seed is in firm contact with the soil.
- Farming Style: No-till and strip-till fields often have more leftover plant material on top. Spiked or curved tine wheels are usually better for getting through that residue and closing the trench evenly.
- Crop Type: Some crops, like soybeans, need really precise planting. If you’re planting small seeds, good soil contact is even more important, so you’ll want wheels that can gently firm the soil without crushing it.
- Planter Compatibility: Not all wheels fit every planter. Check your planter’s model and talk to your dealer or manufacturer before buying. Some wheels are made for specific brands or models, and using the wrong size can lead to trouble.
If you’re not sure what will work, talk to local farmers or your extension office. Some growers will run side-by-side tests in the same field, swapping out different wheels for a few rows to see which closes the best. Watching how plants emerge in those test strips can teach you a lot, sometimes more than any manual or sales pitch.
Step-by-Step: How to Adjust and Install Closing Wheels
Switching or adjusting closing wheels sounds like a big job, but it’s often pretty simple with a few basic tools. Here’s a step-by-step guide that fits most planters:
- Park your planter on level ground and lift it up safely. Make sure it’s stable before you start any work.
- Take a close look at the wheels you want to replace. Most are held on by a bolt, nut, or pin. Loosen and remove the fastener. Sometimes a little rust makes this tricky, so keep some penetrating oil handy.
- Choose your new wheels. Double-check that the axle size, width, and mounting style match your planter. If you’re mixing types (like a rubber wheel on one side and a spiked wheel on the other), make sure both are made for your planter model.
- Slide the new closing wheels onto the arm. For spiked or curved tine wheels, check the space between the two wheels. Most planters work best when the wheels are set about 1.5 to 2 inches apart at their closest point.
- Re-tighten the bolt or nut. It should be snug but not too tight, the wheels need to spin freely but not wobble. Give them a spin to make sure they move smoothly.
- Lower the planter and check the contact angle. The closing wheels should touch the soil just behind where the seed drops. They should press the sides of the trench together, not dig in too deep or ride too high.
- Test your adjustments in a small area of the field. Plant a short strip, then get out and dig to see how the seed is covered. Is the soil packed just right, firm but not hard? Is the trench closed with no gaps?
If things don’t look right (maybe the trench isn’t closing or the soil is packed too tightly), adjust the downforce or spacing. Try swapping one or both wheels if you need to. Fine-tuning can take a bit of trial and error, but the payoff is worth it.
One tip: When switching from one crop or field to another, run a quick check. Even small changes in soil type or moisture can call for a different setup.
Common Closing Wheel Problems and How to Fix Them
Even the best equipment can run into trouble. Here are some issues you might see with closing wheels, plus what you can do about them:
- Trench Not Closing: If you see open gaps or the seed trench isn’t sealed, try switching to a more aggressive wheel (like spiked or cast iron), change the wheel angle, or increase the downforce. Sometimes just cleaning off a plugged wheel helps.
- Soil Compaction: If the soil is packed down too hard, roots will have a tough time. Use lighter wheels or reduce the pressure. In wet fields, swap to spiked or tine wheels that crumble rather than pack the soil.
- Wheels Plugging Up: Mud and sticky soils can clog up wheels, especially smooth or rubber ones. Spiked and open-design wheels handle wet, sticky conditions much better because they shed mud as they turn.
- Uneven Depth: If you notice one side of the row is higher or the seed isn’t covered evenly, make sure both wheels are set to the same height and angle. Bent arms, worn bearings, or loose bolts can all cause uneven coverage.
- Wear and Tear: Over time, the edges of closing wheels can wear down, or bearings can get noisy. Inspect your wheels before every planting season. Replace wheels that have lost their edge or wobble on the axle, and always check for bent arms or loose hardware.
Sometimes problems are caused by more than just the wheels. If you see repeated issues, check the whole row unit, and don’t forget to look at how your planter gauge wheels and seed openers are working, too.
Comparing Popular Closing Wheel Options: What Works Best?
Farmers love to debate which planter closing wheels work best, but the real answer is that it depends on your field conditions. Here’s a quick summary to help you match the right wheel to your needs:
- Rubber wheels are best for well-tilled, moist soil where you want a gentle touch.
- Spiked or finger wheels are ideal in heavy, wet, or high-residue fields. They help break up tough spots and close the trench when other wheels might slip or clog.
- Cast iron wheels shine in dry, hard soils. Their weight gives you firm closing even when the ground is tough.
- Curved tine wheels are a top pick for no-till or minimum-till systems. They leave the soil loose and crumbly, which helps water soak in and roots break through.
Some planters let you run two different types of wheels at once. For example, putting a rubber wheel on one side and a spiked wheel on the other can help balance firming with soil breakup. This setup is especially handy if your field has variable soils or spots with more residue than others.
If you’re curious about a new type, try it out on a few rows before switching the whole planter. Many local dealers will let you test different wheels, or you can swap with a neighbor for a day. Seeing how the plants emerge, side by side, is the best proof.
When Should You Upgrade Your Closing Wheels?
Wondering if it’s time to switch out your closing wheels? Here are some signs to watch for:
If you spot uneven stands, skips in the row, poor germination, or air pockets when you dig in the row, your closing wheels might be the problem. Upgrading can solve these issues, especially if you’ve changed your tillage style, started planting new crops, or noticed shifts in your soil conditions. If you’re moving from conventional tillage to no-till, for example, your old smooth wheels might struggle to close the trench in residue-heavy fields.
Farmers who upgrade often report better seed-to-soil contact, faster and more even emergence, and stronger stand counts. It’s a simple, cost-effective change that pays off at harvest. New designs and materials come out every year, too, so it’s worth checking what’s available, sometimes a small update can make a big difference.
Don’t forget, closing wheels also wear out over time. If yours are several seasons old, check for cracks, worn edges, or noisy bearings. Replacing tired wheels before you hit the field can prevent headaches later.
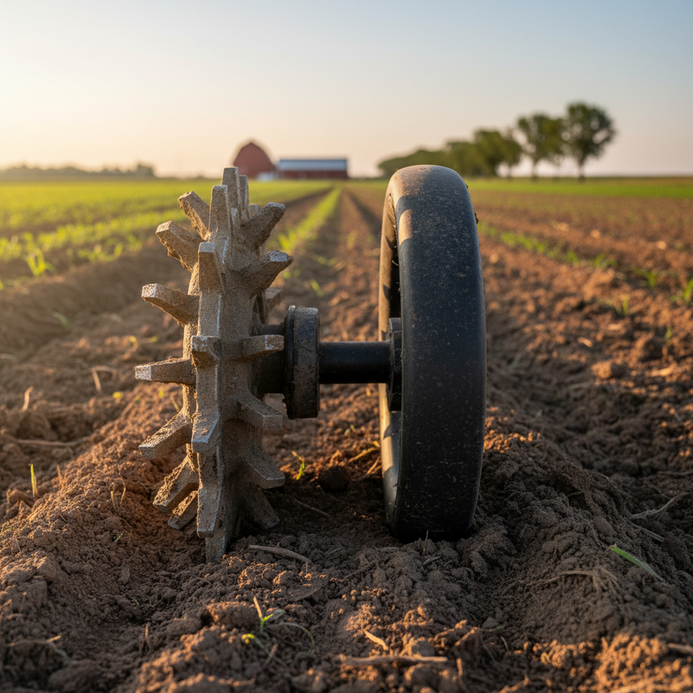
[Inline Image]
A close-up shot of spiked and rubber closing wheels side by side on a planter, showing the difference in design and soil contact. Early morning field setting, realistic detail, natural colors.
Conclusion
Closing wheels might seem like a small part of your planter, but they have a huge effect on your crop’s success. Choosing the right type, keeping them in good shape, and adjusting them for your field’s needs can help every seed get off to a strong start. If you’re not sure which closing wheel options are right for you, consult us today for friendly advice and expert support.